If I got a dollar each time someone asked for yoga poses to strengthen the core/ slim the tummy/ tone the abs, I could’ve retired last week. Most of us want a strong core for aesthetic reasons, but core strength comes with a myriad of benefits.
A strong core provides stability for the rest of the body. It is the key to good posture, fluidity when walking or running, and it even affects our respiratory and digestive health. Think about it: all of our extremities eventually attach to the core; if we want all those bones, muscles, joints, tendons and ligaments to work in harmony, it starts at the core.
By strengthening the core, we can alleviate pain in the shoulders, low back, hips, knees, and feet. These are common pain points for many Americans, especially those of us with desk jobs.
Below is a video outlining 5 yoga poses for stronger abs and a stronger back. I’ve also typed out some details below.
PLANK: TRADITIONAL PLANK, REVERSE PLANK, & SIDE PLANK
Stance: Begin on your hands and knees. Keep the hips in line with the shoulders and the ankles. Tuck the toes under so that your weight is on the balls of the feet; press into the hands and feet as you lift the knees and straighten your legs.
Hips: Avoid letting your hips sag. If lifting the hips causes discomfort in the lower back, lift the hips upwards even higher rather than letting them sag. The same is true when you are in side plank.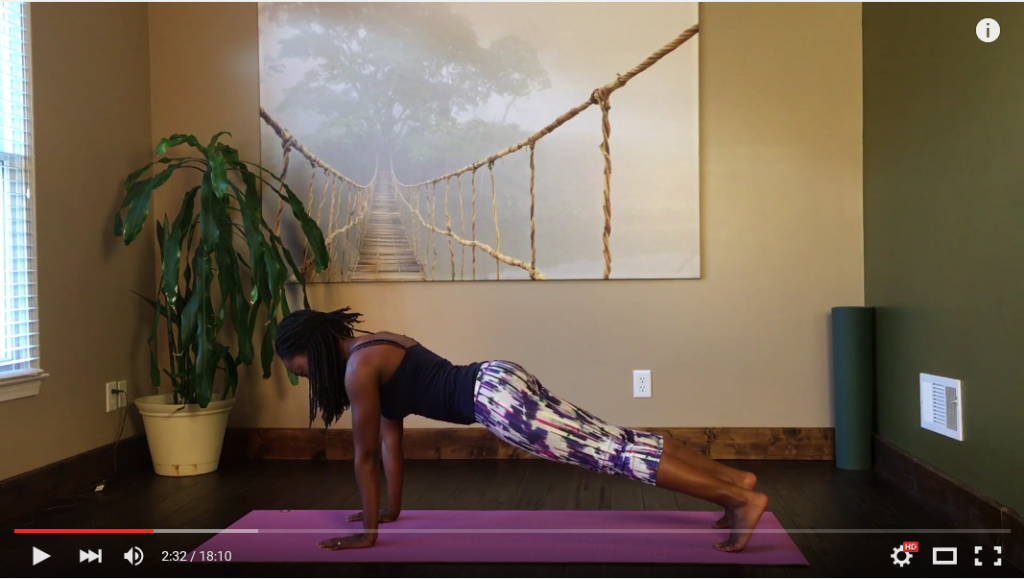
Hands: For traditional plank, place your hands directly under your shoulders. Press into your fingertips and the mounds at the base of each finger. (This will minimize wrist pain during long holds.)
Shoulders: Press into the floor with your hands, as if you wanted to push the floor away from your body. That engagement encourages you to lift out of the shoulders. Try to minimize congestion between the neck, ears, and shoulders.
Midsection: Engage the core by squeezing the navel in towards the spine. This will offer support for your midsection and encourage you to work the right muscles. Keep this in mind during side plank and reverse plank as well.
Begin by holding plank of 15 seconds, and then increase your time up to one minute. Once you can hold plank, side plank, and reverse plank for one minute, consider playing with more complex modifications of the pose!
Modifications:
- If you have a wrist injury or chronic pain, consider forearm plank as an alternative.
- If you find that lifting your hips in plank to too difficult right now, rest both knees on the ground in traditional plank (or the knee closest to the ground in side plank). This modification promotes better alignment while you’re building strength for the full expression of the poses.
- For more of a challenge: consider lifting and one leg in plank pose. Then progress to lifting one leg and the opposite arm at the same time.
- For more of a challenge in side plank: bend your uppermost knee and place the sole of the foot against the shin or thigh of your supporting leg. Then progress to extending the top leg towards the ceiling, or create a bind by taking hold of the big toe before extending the leg towards the ceiling.
- In side plank, you can also explore extending the bottom leg and resting the foot from the uppermost leg on the floor. Awesome work for the obliques!
KNEE-TO-ELBOW FLOW
Stance: Position your hands directly under your shoulders and your knees directly under your hips. If you have joint sensitivity, consider padding your knees with a blanket or folding your mat in half to create extra padding.
Hips: Lift and straighten your right leg, keeping the toes pointed down towards the mat. Be sure that right hip stays level with the left hip.
Arms: Lift the left arm, keeping the arm straight, and bringing your bicep in line with your left ear.
Movement: Create a deep crease in your right hip flexor as you bring the right knee forward under the chest. At the same time, bend the left arm and draw the elbow back to meet the knee. Allow the back to arch drastically, engaging the muscles of your abdomen. For the most core engagement, lift the knee and the foot as far from the ground as possible. Unravel the pose, returning to the straight leg and straight arm position. Repeat.
Legs: If you want to work the glutes and the hamstrings in addition to the core, focus on lifting your right leg higher each time that you extend the leg.
Repeat the contractions for 3 sets of 10 reps each, or hold the contraction for 15 seconds and then gradually increase your hold time.
Modifications:
- If these motions are too taxing on the body, consider holding the pose: pull one knee forward towards the opposite elbow and hold it there for 5-7 slow breaths. Focus on squeezing the navel towards the spine and pulling the shin as far away from the floor as possible.
- You can also work on engaging the core while just lifting the arms: keep the neck neutral with your face towards the floor. Focus on lifting and extending one arm at a time. Move slowly, with intention, as you let the movement originate from the shoulder and back rather than relying on momentum to swing the arm up.
RECLINED STAFF POSE LIFTS 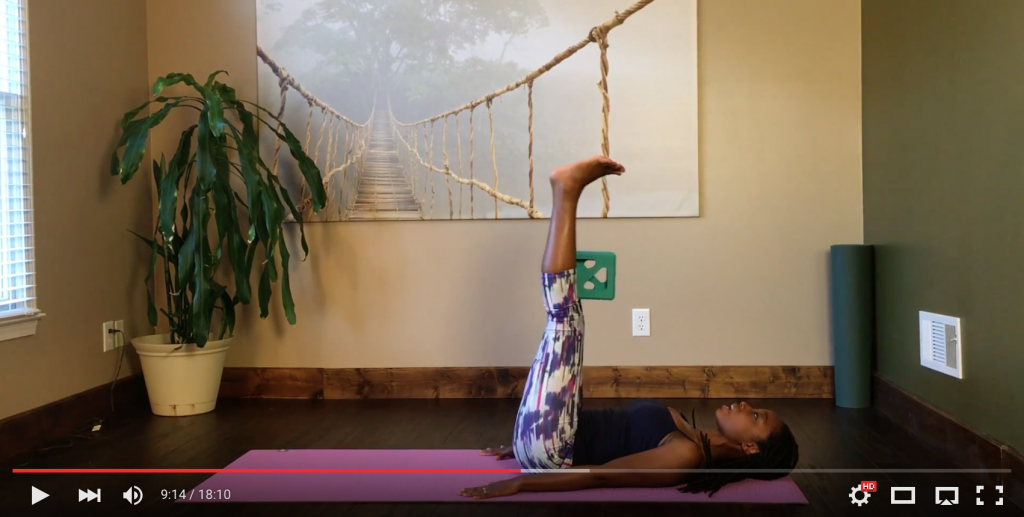
Stance: Lie down on your back with your legs extended. Flex the feet. Roll the shoulders underneath you so that the blades of your shoulders rest flat against the floor. Press the sacrum down into the mat. Do not flatten the back against the mat. Preserve the nature curve of your lumbar spine.
Movement: Tighten the core by pulling your navel towards the spine. Press down through the hips and hands as you lift both legs in unison. Squeeze the legs together. Avoid letting the back or shoulders lift to counterbalance the weight of your legs. It may help to engage the pelvic floor (contract the muscles that you use to stop a stream of urine) as you left. With control, slowly lower the legs back to the floor.
To work the obliques, take the leg movement from side to side. Begin in a reclined twist with the knees bent. Engage the core as you lift the legs in unison, bringing the knees towards the ceiling ad the shins parallel with the floor. Then let your knees and shins descend towards the opposite side. For a greater challenge, extend the legs.
Aim for 3 sets of 10 reps each and increase the reps. If you opt to hold the pose stagnant with the legs lifted at a shallow angle (detailed below), begin by holding for 15 seconds and gradually increasing your hold time to one minute.
Modifications:
- Consider lifting one leg at a time as you build strength. Do not rely on momentum to raise the leg. Rather, lift it very slowly while pressing the hips and navel into the floor.
- You can also begin with the legs lifted, as perpendicular to the floor as your hamstrings allow. Then begin to lower the legs until you feel your back attempting the arch to compensate for the weight–stop there. Hold for 5-7 breaths and then lift the legs back so that they are perpendicular to the floor. With each rep, focus on lowering the legs a bit more without lifting the torso.
- If you find it difficult to lift the legs in unison (we are often stronger on one side than the other) squeeze a block between the thighs or shin.
WARRIOR 3 FLOW

Stance: Stand towards the front of your mat with your feet parallel with the long edges of your mat. Bring your hands together, palms touching, at the center of your chest.
Legs: Begin to shift weight into the left foot, distributing your weight evenly between the ball of the foot and the heel.
Movement: Lift the right heel up out behind you, keeping your toes pointed towards the floor. Let your torso descend at the same pace as your leg rises, like a seesaw. Work towards creating a level plane from your head, through your hips, and then to your heels. Hold this pose for 5-7 breaths and gradually increase the duration of time as you gain strength.
You can also turn this into a flow: From Warrior 3, reverse the motion so that your heel lowers as your torso lifts back to an upright position. Rather than letting your right foot rest on the floor again, engage the core as you pull the right knee up towards your chest. Avoid letting your shoulders fall out of line with your hips to counterbalance the lifted leg. Instead, by tightening the core, keep the torso upright. Let your hip serve as a hinge as you flow between warrior 3 and standing knee-to-chest poses.
If you opt to hold Warrior 3, hold it for 15 seconds and then gradually increase your time. If you take the flow, create 3 sets of 10 reps on each side.
Modifications:
- To help with balance, place a block on the floor under your chest. Rest your hands on the block as you lift one heel away from the floor. Then slowly practice drawing your back upward until it is parallel to the floor.
- For additional help with balance, consider extending the arms out beside you, like airplane wings. This may also be a good modification for those who are still developing back and shoulder strength.
- For more of a challenge and to integrate greater hamstring and glute engagement, pass through Warrior 3 and continue to lift the heel higher than your back and shoulders.
- For more of a challenge for the back and shoulders, take the full expression of warrior 3: extend the arms so that the biceps fall in line with the ears. Create a plank extending from your hands through your shoulders, hips, all the way down to your heels.
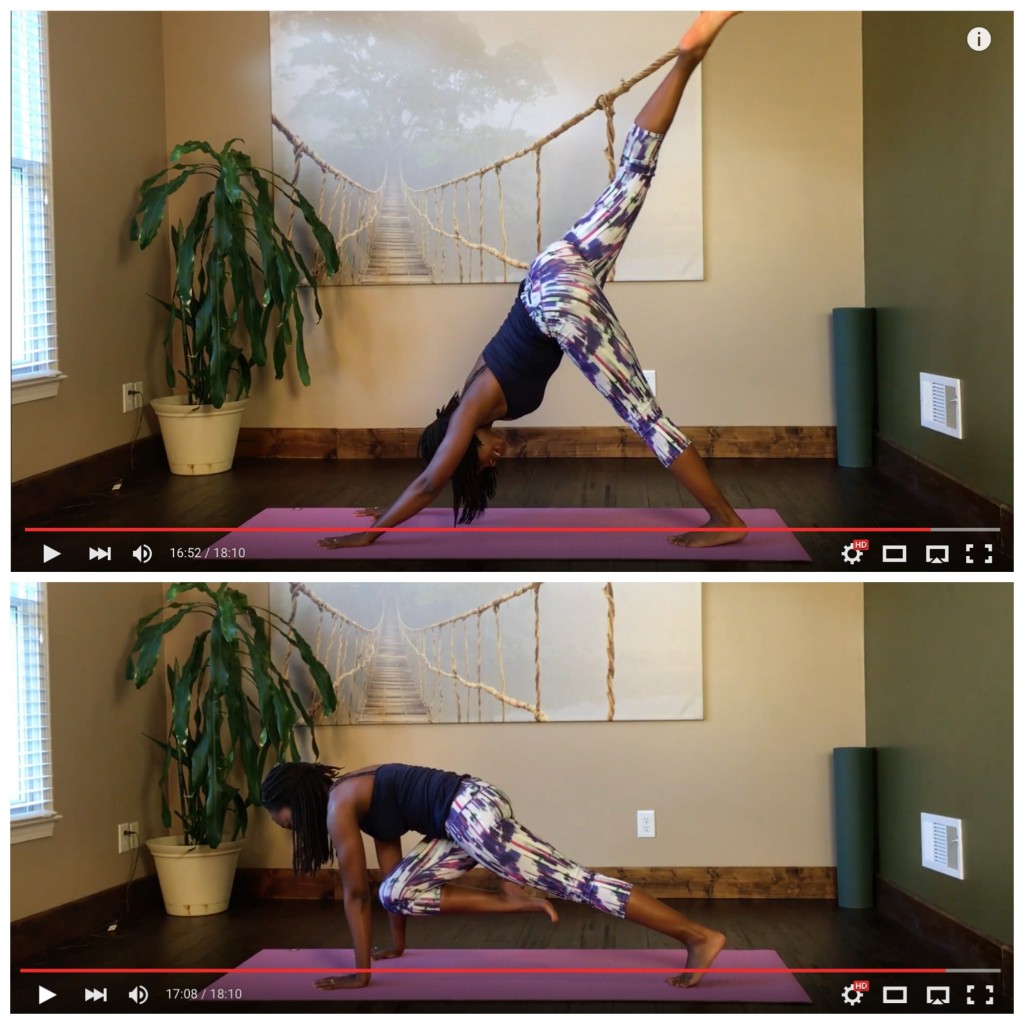 Downward Facing Dog to Knee-to-Elbow Flow
Stance: Begin in hands and knees pose with the hands under the shoulders and the knees under the hips (or slightly behind the hips). Tuck the toes under. Lift the hips upward and backward, creating one long line of energy from the hands to the shoulders and up to the hips. Relax the neck and take your gaze to your thighs. Lengthen the backs of the legs and let your heels sink towards the floor.
Movement: Lift to right heel towards the ceiling as you inhale (three-legged-dog). Exhale and draw the knee forward between the elbows as you lower the hips and shift your weight forward into the hands. Pull the thigh into the chest so that your shin hovers as far away from the floor as possible.
You can hold the contracted pose for 5-7 breaths, or let the next inhalation lift the heel back towards the ceiling to three-legged dog. Repeat with each inhalation and exhalation. Do 3 sets of 10 reps each.
Modifications
- To work the back, glutes and hamstrings without the contraction, work on transitioning from downward facing dog to three-legged dog (lifting the leg only).
- If you experience pain in the wrists, remember to press into the fingertips and mounds of the fingers to alleviate weight in the wrists. It may also help to take a wider stance and create a more shallow angle for the wrists.