I’d like to dedicate this post to a good family friend, Julia. I spoke with her at a family event and discovered that these issues run in her family. It occurred to me that there may be many people out there who are struggling with sciatica. Hopefully, this helps!

What is the Sciatic Nerve and What Did I Do to Damage It?
The sciatic nerve is a major nerve extending from the lower end of the spinal cord. It travels down the back of the thigh and divides above the knee joint. It then continues down the leg. It’s often damaged by strenuous activity or poor alignment during routine activities.
How do you know when you’ve damaged your sciatic nerve? Trust me, you know. It’s like a toothache for your lower body. Sciatica comes on suddenly and is quite sharp. This pain can be temporarily debilitating, preventing a full range of motion in the foot, ankle, calf, thigh or buttocks. (Just realized that one ever sounds cool saying buttocks. Or writing it.) There are serious cases where sciatica is felt in the upper thigh and lower back.
Why Are Yogis at Risk?
We do weird stuff with our bodies all of the time. We spend so much time stretching and bending and twisting–nothing below the waist is exempt. That’s why sciatic nerve damage can be such a grim reality for us if we are not careful.
Tried and true alignment during asana is what helps us continue a practice without harm. There are schools of thought in yoga that deemphasize the importance of alignment. In classes with a faster pace, alignment is often overlooked. Instructors may give verbal cues, but they don’t necessarily offer individual corrections. This can also be a problem in very large classes, too. Instructors can’t pay special attention to everyone, which means improper alignment may be overlooked.
It’s important to educate yourself. This is the only way–aside from carrying a guru in your back pocket–that you can significantly decrease your chances of injury.
5 Yoga Poses to Relieve and Prevent Sciatic Nerve Pain
If you’re already feeling pain, consult your doctor or chiropractor before beginning an asana yoga practice. Sciatica isn’t something to goof around with. Once you get the green light, then consider integrating these poses into your practice. (You may considering showing your doctor pictures and getting her opinion on each pose!)
One thing that you’ll notice is that all of these poses open the hips and stretch the hamstrings.
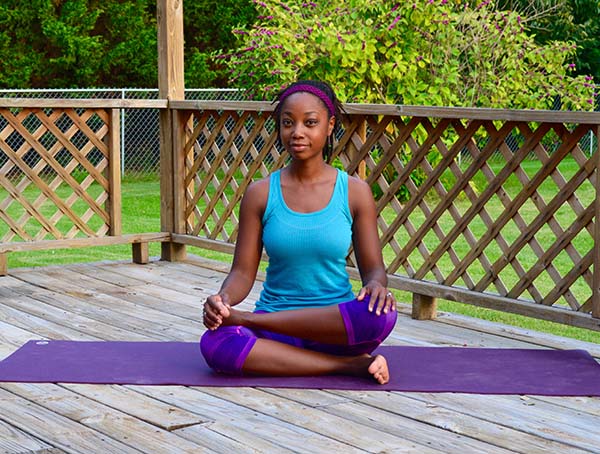
Agnistambhasana
Fire logs pose provides a deep stretch for the glutes and iliopsoas muscles. Those muscles allow us to flex at the hip.
To begin, tuck your left foot under your right thigh or outside your right hip. Then stack your right leg on top of the left leg, lining up your right ankle with your left knee. I can already feel the stretch engage here! For a smidgen more, bring your right ankle to the outside of the left knee.
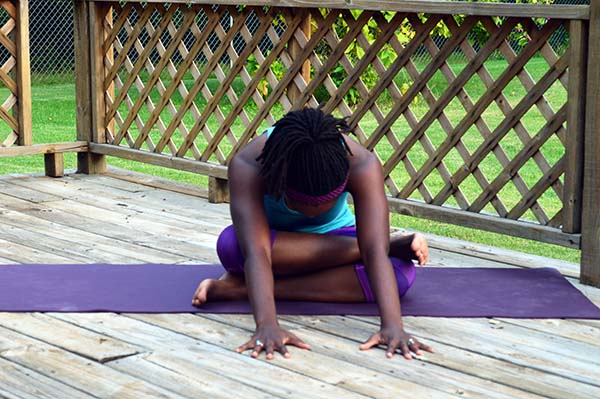
 If a deeper stretch is available, draw your left foot forward so that it rests directly under right knee (rather than being tucked in near the hip.) To bring the stretch into the lower back, gently hinge forward from the hips. Extend your hands in front of you or rest your forearms on the floor.
Gomukhasana
This is a terrific pose for prevention! With all of its variations, you can show love to most muscles and tendons between your glutes down to your knees. If you’re already injured (yet your doc says this pose is okay) then try a variation with one leg extended rather than crossing both legs at the knee.
Getting into cow face pose is a beast. Some people can cross their knees while they’re seated. I prefer to start from kneeling. I lean forward and rest most of my weight into my hands. Then I cross my legs at the knee before gently lowering my bum to the floor.. Whatever works for you.
The important things to remember in the lower body: keep both sit bones grounded and keep your feet flexed. (The latter will prevent knee injury.) Try to keep your feet the same distance apart from your thighs. If one foot is tucked in more than the other, wiggle it forward to match the least flexible side.
Simply crossing your legs at the knee may be plenty of stretch for you. Many days, I just rock out right here.
If you want a deeper stretch, gently hinge forward from the hips–core engaged–and rest your hands or forearms on the ground. Keep both sit bones grounded. You should feel both bum cheeks on the ground. If you’re injured skip this part! It may be a good idea to keep your hands rooted onto the floor for support.
Traditionally, the upper body consists of a bind. If you’re focusing on stretching the groin, hips, and thighs then the bind is not necessary.
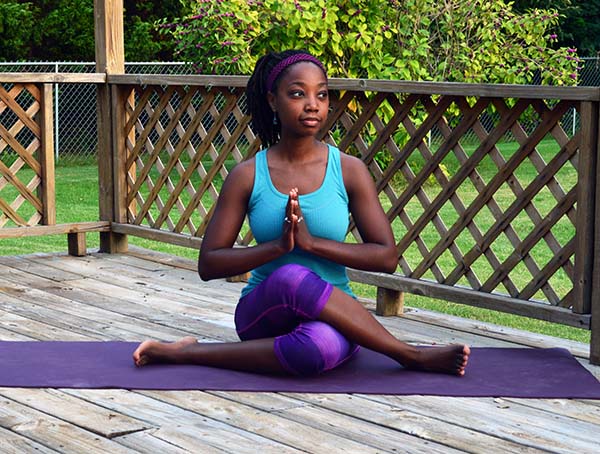
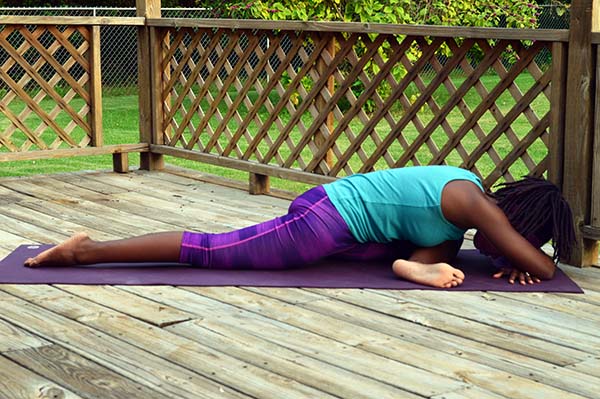
Rajakapotasana
This is one of my favorite poses of all times for…everything. I often release into this pose from three-legged dog, swinging my right leg through before resting it on the mat. It feels so good! Anyway, if you’re starting with your left leg forward, wiggle your left shin forward so that is is parallel to the front edge of your mat. (It’s 300% okay if your foot is stucked closer to your right hip. You’re still getting the stretch!) The closer your left shin is to parallel, the deeper the stretch. Hang out here.
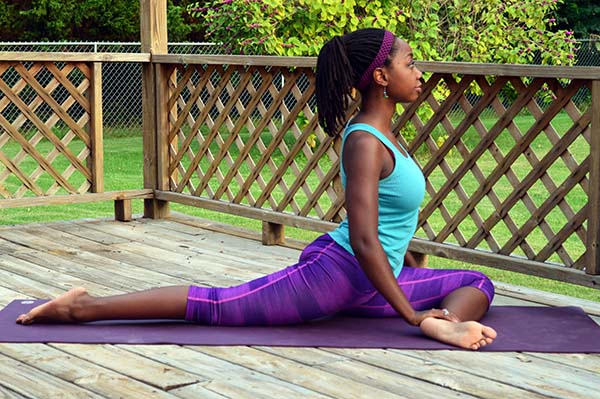
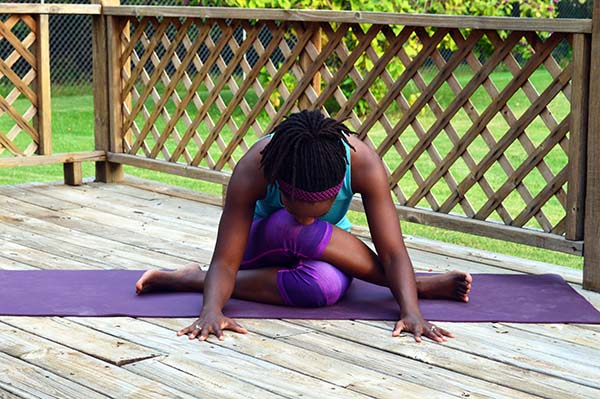
For more, engage your core, elongate your back, and hinge forward from the hips. Think about bringing your chest towards your shin rather than your forehead to the floor. This will keep you from rounding your back so much. Bring your hands or forearms down to the floor.
At this point, it’s easy to roll all of your weight onto your left leg. Resist the urge! Keep your hips parallel to the floor, sort of resting your weight equally between both sides of your body.
Be gentle. Be patient. And most importantly, listen to your body!